One of the ways to check Students' understanding of the course materials is to create assignments that Students should complete. The Assignments section of the course allows you to create multiple assignments of various types and grade them.
To work with the course Assignments, enter the course and click the Assignments (![]() ) icon in the left course menu. You will see the list of existing Assignments for the course.
) icon in the left course menu. You will see the list of existing Assignments for the course.
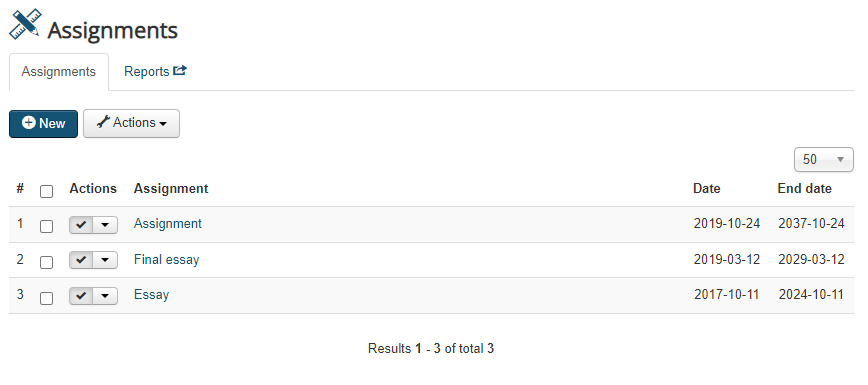
 Tip: If you don't see the Assignments menu item in the left course menu, make sure it is published at Step 4 of the Course Builder or in the back-end Configuration > Menu Manager.
To manage the assignments in the list, use the Actions ( ) button.
Creating Assignments
To create a new assignment, follow these steps:
- In the Assignments section of the course, click New. You will be redirected to the new assignment page.
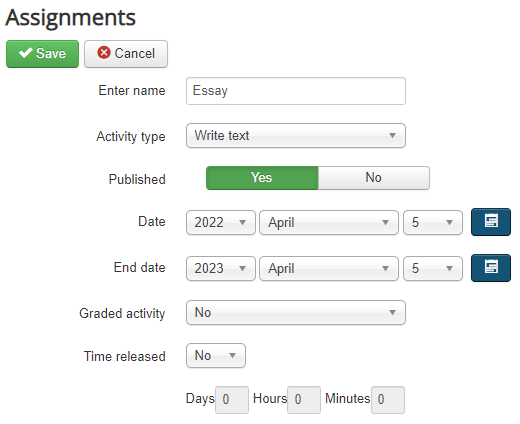
- Configure the parameters for the new assignment:
- Enter name: specify the name of the assignment.
- Activity Type: select Offline activity if users don't need to meet any requirements to mark the assignment as complete. Select Write text if users have to enter any text in the designated text area in order to mark the assignment as complete. Select Upload a file if users have to attach a file to the assignment in order to mark it as complete.
- Published: select Yes if the assignment should be visible to Students or No if you don't want the Students to see it yet.
- Date: select the date when the assignment should become available for Students. You can select the date from the drop-down menus for Day/Month/Year or pick it from the Calendar by clicking the Calendar (
 ) icon.
 - End date: select the date after which Students should no longer be able to submit the assignment. The assignment will remain visible to Students but they won't be able to mark it as completed.
- Graded activity: select No if the assignment should only be marked as passed or failed. Select Yes if the assignment should be graded using the full Grade scale from the Gradebook section of the course.
- Time released: If you wish this assignment to become published in a certain period after the Student's enrollment you can use this feature to determine a period of time after which the assignment will be published. Select Yes if you wish to enable this feature and the fields on the next line below will become active. Enter the necessary time period in days, hours or minutes in the respective fields.
- Limit to specific groups of learners: select No if the assignment should be available for all the Students of the course. Select Yes if the assignment should be available only to the members of a specific usergroup.
 Note: If you select Yes for Limit to specific groups of learners, the UserGroups field below will become active; make sure to select at least one usergroup, otherwise the assignment won't be visible for any learners at all.
 - Short description: specify a short description for the assignment, if any, it will not be visible for Students.
- Description: enter the description of the task that Students should fulfill in order to complete this assignment.
- Click Save to save the assignment. You will see the new assignment in the list of assignments.
Grading Assignments
When your Students are done with an assignment, they will mark it as Complete. The completed assignments can then be graded in the following way:
- In the Assignments section of the course, click the Reports tab. You will see the list of all the assignments completed in this course by all students. The list of the reports can be filtered by the assignment status, usergroup, assignment name, and user.
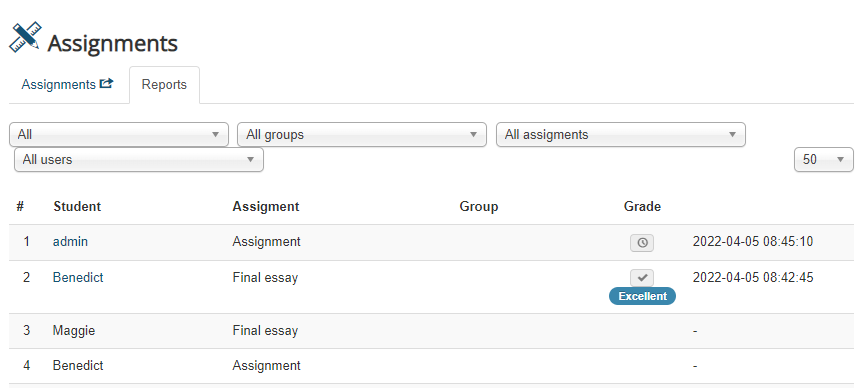
- Click the name of the user who submitted the assignment to the left of the report you wish to grade. The assignment details will open, including the following:
- Description: depending on the type of the assignment, you will see here either a link to download the file that the Student attached or the text that the Student wrote.
- Comments: you can leave some comments for the student to read in this text area.
- Grade/Mark this activity: depending on the type of the assignment, you will see the following options in this drop-down menu:
- Passed/Not passed: if the assignment type is non-graded, you can only mark it as Passed if the Student was successful in completing the task, or Not passed if the Student failed.
- Grade scale: if the assignment type is graded, you will be able to select a grade for the assignment out of the current grade scale configured for your course.
Note: If you don't see any grades available in the drop-down menu when you try to grade an assignment, make sure you have the Gradebook scale for this course configured in the Gradebook section.
- Incomplete: regardless of the assignment type, you can mark the assignment as Incomplete if you want to return it to the Student for some additional work or changes.
- Mark/grade the assignment or mark it as Incomplete to return to the Student for some extra work on the task. You can also add some comments if you wish.
- Click Save to save the changes. If the assignment was graded, you will see the grade and a check mark in the Grade column next to the assignment at the Reports tab, otherwise you will see the Awaiting teacher's review (
 ) icon.