You can facilitate the eLearning process by adding various documents to courses. The Documents section of the course allows you to create a repository of files which your Students can view online or download to their local devices.
In this article you will learn how to manage the folders and documents and how to link the documents from File Library to the course.
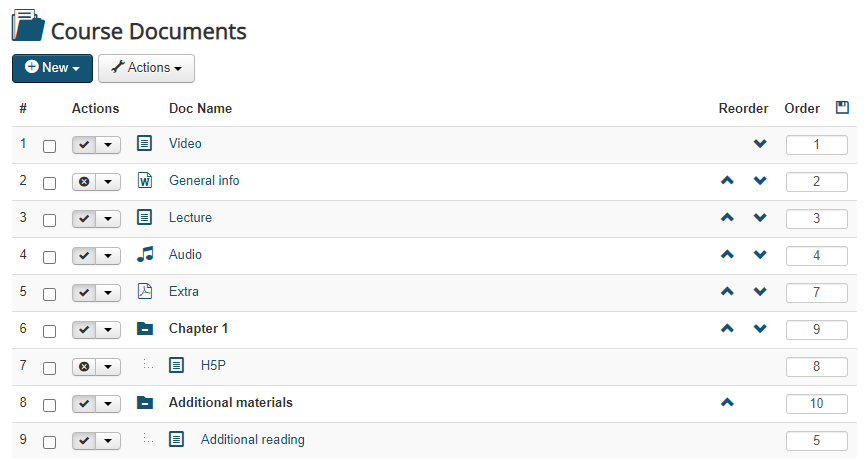
To work with the course documents, enter the course and click the Documents (![]() ) icon in the left course menu. You will see the list of course folders and documents organized in a tree structure.
) icon in the left course menu. You will see the list of course folders and documents organized in a tree structure.
 Tip: If you don't see the Documents menu item in the left course menu, make sure it is published at Step 4 of the Course Builder or in the back-end Configuration > Menu Manager.
To manage folders and documents in the list, use the Actions (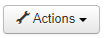 ) and Reorder (
 ) buttons.
To view or download a document, click the document name link in the list. Depending on the type of the file, the system will either display the document online or will offer it for downloading.
Creating folders
To make access to your documents more convenient, you can create folders and subfolders in the Documents course repository. The folders are added in a tree-structure allowing you to create a branched hierarchy. The root folder in this structure is always the Course Folder itself.
To create a new folder, do the following:
- In the Documents section of the course, click New > New Folder. You will be redirected to the new folder page.
- Configure the parameters for the new folder:
- Enter name: specify the name of the folder.
- Place in: select an existing folder from the drop-down list as a parent folder if you wish to create a subfolder, otherwise leave Course folder pre-selected.
- Publishing: select Yes if the folder should be visible to Students or No if you don't want the Students to see it yet.
- Start date: select the date when the folder should become available for Students, if any. You can select the date from the drop-down menus for Day/Month/Year or pick it from the Calendar by clicking the Calendar (
 ) icon.
 - End date: select the date when the folder should stop being available for Students, if any.
- Time released: If you wish this folder to become published in a certain period after the Student's enrollment you can use this feature to determine a period of time after which the folder will be published. Select Yes if you wish to enable this feature and the fields on the next line below will become active. Enter the necessary time period in days, hours or minutes in the respective fields.
- Short description: specify a short description for the folder, if any, it will not be visible for Students.
- Description: specify a description for the folder, if any, it will be visible for Students.
- Click Save to save the folder. You will see the new folder in the list of documents and folders.
 Note: After the new folder is saved, one more setting becomes available (Professional version only). You can set custom permissions for folders when editing them, see more details below.
- Custom permissions: define special actions that are allowed for users with a certain user role, if necessary. Select the user role for which you need to set custom permissions from the drop-down menu and check the boxes corresponding to the actions that users with this role will be able to perform with this folder, then click the green plus (
 ) button to add the custom permissions. To remove the configured custom permissions, click the red X (
 ) button next to the selected set of permissions.
- Custom permissions: define special actions that are allowed for users with a certain user role, if necessary. Select the user role for which you need to set custom permissions from the drop-down menu and check the boxes corresponding to the actions that users with this role will be able to perform with this folder, then click the green plus (
Adding Documents
The system allows you to create new Documents in several different ways, with or without uploading files from your computer. To add a new item into the Documents section, follow these steps:
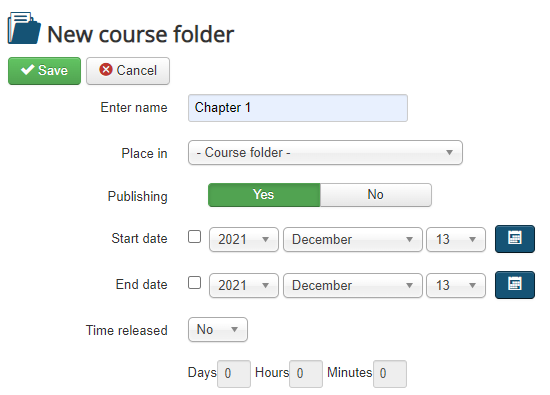
- In the Documents section of the course, click New > New Document. You will be redirected to the new document page.

- Configure the parameters for the new document:
- Enter name: specify the name of the document.
- Choose a file: browse the files on your local computer/device and select the file to be uploaded to the course as a new document. To add more than one file at a time, click the Plus sign (
 ) button.
 - Automatically extract zips after uploading: if you wish to add a number of files and/or folders from a zip archive preserving the structure of files and folders, select Yes from the drop-down menu. If you want to add an archive to the Documents section so that your Students could download the archive, select No.
Note: If you wish to upload a single file or several files using the Plus sign button above, you can still leave the default Yes pre-selected for this setting.
- Upload zip file as CONTENT-package: select Yes if you are going to upload a zip archive with a multimedia content package inside (should contain an HTML start page). Select No if the archive you wish to upload should be extracted automatically.
Note: The content-package differs in format from a SCORM or an AICC package. You can only upload content-packages in the Documents section, SCORM/AICC should be uploaded in the Learning Paths section.
- Place in: select an existing folder from the drop-down list if you wish to place this document in a specfic folder, otherwise leave Course folder pre-selected.
- Publishing: select Yes if the document should be visible to Students or No if you don't want the Students to see it yet.
- Start date: select the date when the document should become available for Students, if any. You can select the date from the drop-down menus for Day/Month/Year or pick it from the Calendar by clicking the Calendar () icon.
- End date: select the date when the document should stop being available for Students, if any.
- Time released: If you wish this document to become published in a certain period after the Student's enrollment you can use this feature to determine a period of time after which the document will be published. Select Yes if you wish to enable this feature and the fields on the next line below will become active. Enter the necessary time period in days, hours or minutes in the respective fields.
- Short description: specify a short description for the document, if any, it will not be visible for Students.
- Description: specify a description for the document, if any, it will be visible for Students.
Tip: If you don't want your Students to be able to download the text file you added as a document, then instead of selecting the file on your local computer/device and uploading it to the course you can add the text in the Description field and then format as necessary using the Joomla! CMS default visual editor. As a result a so-called content page will be created with the text displayed for the Students online inside the course with no option to download it.
- Click Save to save the document. You will see the new document in the list of documents and folders.
Adding Documents from File Library
The documents that need to be added to multiple courses simultaneously can be uploaded to the File Library repository, for more information, see File Library. You can link a document from the File Library to the course in the following way:
- In the Documents section of the course, click New > Add a document from the Library. You will be redirected to the page where you can select one or more documents to be added.
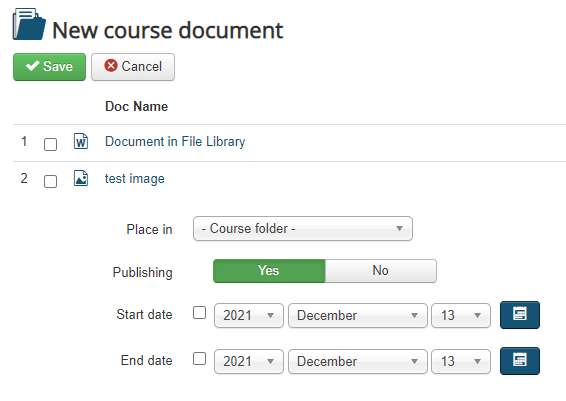
- Configure additional parameters for the document:
- Doc Name: check the box next to one or more documents from the File Library that you wish to add to the course.
Tip: If you don't see the document you wish to link to the course in the list here, make sure the required document is published in the File Library and you selected Yes for the Share to courses parameter of this document when configuring it in the File Library.
- Place in: select an existing folder from the drop-down list if you wish to place this document in a specfic folder, otherwise leave Course folder pre-selected.
- Publishing: select Yes if the document should be visible to Students or No if you don't want the Students to see it yet.
- Start date: select the date when the document should become available for Students, if any. You can select the date from the drop-down menus for Day/Month/Year or pick it from the Calendar by clicking the Calendar () icon.
- End date: select the date when the document should stop being available for Students, if any.
Note: Only a limited number of parameters can be configured when you link an existing document from the File Library to the course. To configure the complete set of parameters for the document, you need to go to the File Library. - Doc Name: check the box next to one or more documents from the File Library that you wish to add to the course.
- Click Save to save the changes. You will see the new linked document in the list of documents and folders.