When you create a new quiz or change an existing one, you need to configure its settings. There are five tabs with different quiz settings available:
In this article you will find the detailed information on configuring all the settings available for a quiz in JoomLMS.
Parameters
The Parameters tab allows you to configure the general settings of the quiz.

The following settings can be configured in the Parameters tab:
- Enter name: specify the name of the quiz.
- Category: select the existing quiz category that should be assigned to the quiz from the drop-down menu.
- Certificate: select the existing quiz certificate that should be assigned to the quiz from the drop-down menu.
- Time limit: specify the period of time (in minutes) that students will have to complete the quiz attempt.
- Passing Score: specify the score (in percent) that students will have to reach in order for the quiz to be marked as passed.
 Note: The Passing Score is calculated out of the total number of points a student can receive for answering questions correctly in a certain quiz. For example, you have 10 questions in the quiz with 10 points assigned to each question. If you set the Passing Score as 50%, your students will have to answer 5 questions correctly to pass the quiz.
 - Published: select Yes, if the quiz should be visible to Students, or No, if you don't want the Students to see it yet.
- Time released: If you wish this quiz to become published in a certain period after the Student's enrollment, you can use this feature to determine a period of time after which the quiz will be published. Select Yes, if you wish to enable this feature, and the fields on the next line below will become active. Enter the necessary time period in days, hours or minutes in the respective fields.
- Description: enter the quiz description or some additional instructions for the Students. This information will be displayed at the start page of the quiz.
- Resume quiz from the last attempt: select Yes from the drop-down menu, if you wish the Students to be able to leave the quiz, then return and continue the quiz attempt from the latest unanswered question. Select No, if you always want the Students to restart the quiz attempt from the very first question.
- Maximum number of attempts: enter the number of times a Student should be able to retake the quiz. By default, 0 is set, which is an unlimited number of attempts.
- Attempt separation: enter the number of minutes a Student should have to wait before retaking the quiz again. By default, 0 is set, which means no waiting time is necessary.
- Enable self-selection: check the box to enable this setting, if you wish the Students to only take this quiz if they want to (an optional quiz). If this option is enabled, you won't have the option to display the results of this quiz in the Gradebook section.
- Show in Gradebook: check the box to enable this setting, if you wish to display the results of this quiz in the Gradebook section. This option is only available if the Enable self-selection setting is disabled.
- Randomize questions: check the box to enable this setting, if you wish to display the questions in a random order. The order will be changed for each new attempt.
- Skip questions: check the box to enable this setting, if you wish the Students to have the option to skip some questions and come back to them again at the end of the quiz attempt. If this option is enabled, the Students will see the Skip button during the quiz attempt.
- Allow users to email results to: select -disable this option- from the drop-down menu, if you don't want the Students to have the option of sending an email with the quiz results enclosed at the end of an attempt. Select to author email, if you want the Students to be able to send the results to the email of the course Teacher who is also the author of this quiz. Select to learner email, if you want the Students to send the results to their own email.
Note: The email with the quiz results is not sent automatically, the Students will only see the Email button at the quiz results page and will be able to choose to click it.
- Enable users to print results: check the box to enable this setting, if you wish the Students to see the Print (
 ) button next to the quiz results in the Gradebook section of the course . The Students will be able to choose to print the detailed quiz results as a PDF file.
 - Show quiz contents: check the box to enable this setting, if you wish the Students to see the complete list of questions when they click the Contents button in the Learning Path (where this quiz is added as a step). If the setting is enabled, the Students will also be able to navigate between the questions when they click the Contents button. If this setting is disabled, the Students will only see the quiz as a single list entry in the Learning Path contents and won't be able to navigate between the questions via the Contents.
Question Pool
The Question Pool tab allows you to add to the quiz a certain number of questions, randomly drawn from the course Question Pool or Global Question Pool (PRO version only).
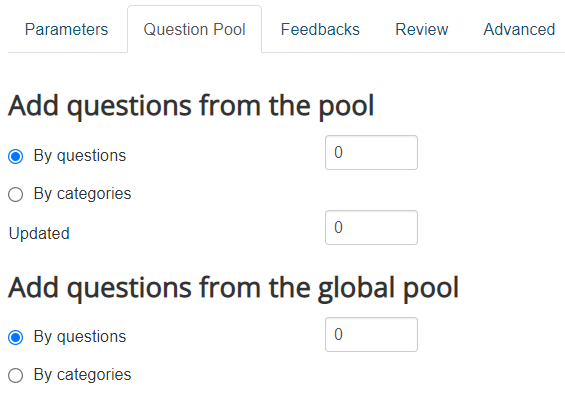
The procedure for adding questions from the course Question Pool and the Global Question Pool is the same, as follows:
- In the Question Pool tab of the quiz settings, under Add questions from the pool or Add questions from the global pool, respectively, select By questions, if you want to add a certain number of questions taken randomly from all question categories in the pool. Select By categories, if you want to add a certain number of questions taken randomly from specific question categories.
- Enter the number of questions that should be taken randomly from the pool, in the field to the right from either the By questions option or the name of the category, from which the questions should be drawn. If you selected to add questions By category, you can specify the number of questions to be drawn from as many different categories as you want.
- Click Save to save the changes. The questions will not be physically moved from the pool to the quiz, they will be automatically drawn from the pool at the beginning of each quiz attempt, so you will not be able to see the exact list of questions, if you click on the name of the quiz.
Note: If you don't want the questions to be drawn from the pool randomly but would like to add some specific questions from the pool one by one instead, you can do it using the respective option when you create a new question in a specific quiz.
Feedbacks
The Feedbacks tab allows you to configure the feedback, provided when Students answer the quiz questions and complete the quiz attempt.
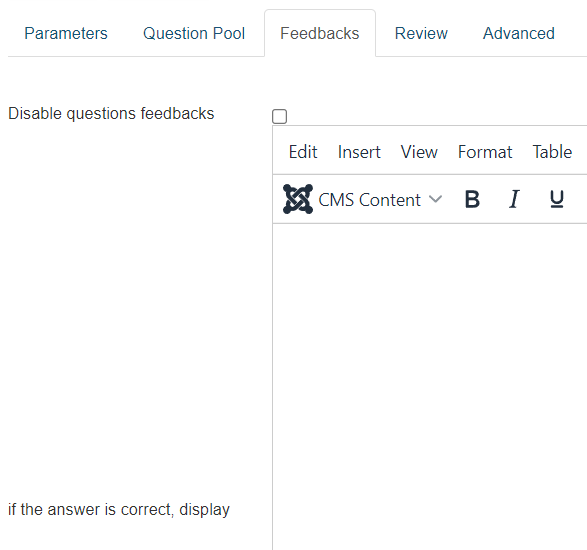
The following settings can be configured in the Feedbacks tab:
- Disable questions feedback: check this box, if you don't want any feedback to be provided when Students answer the quiz questions. If you enable this setting, Students will see no feedback at all after they answer the question, they will be simply redirected to the next quiz question.
Note: The feedback can also be disabled for the whole quiz, hiding the message that the Student passed/failed the quiz from the quiz results page, see the Advanced tab for details.
- If the answer is correct, display: enter your own custom feedback in this field, if you want to replace the default feedback for the correct answer to the question, provided by a Student. By default, the feedback to the correct answer to a question is Your answer is correct.
- If the answer is incorrect, display: enter your own custom feedback in this field, if you want to replace the default feedback for the incorrect answer to the question, provided by a Student. By default, the feedback to the incorrect answer to a question is Your answer is incorrect.
Note: If the question is configured as non-graded or it is a Survey/Likert Scale type question which doesn't have a correct answer, the default feedback will be Your answer is accepted. You can change this default feedback by modifying the JoomLMS language files on your server.
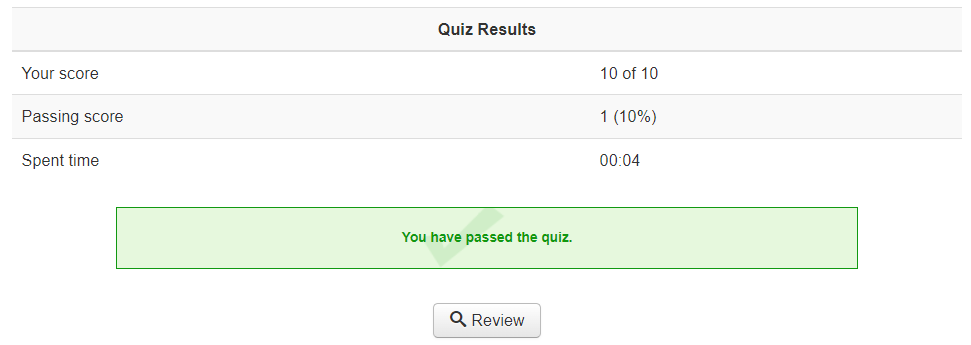
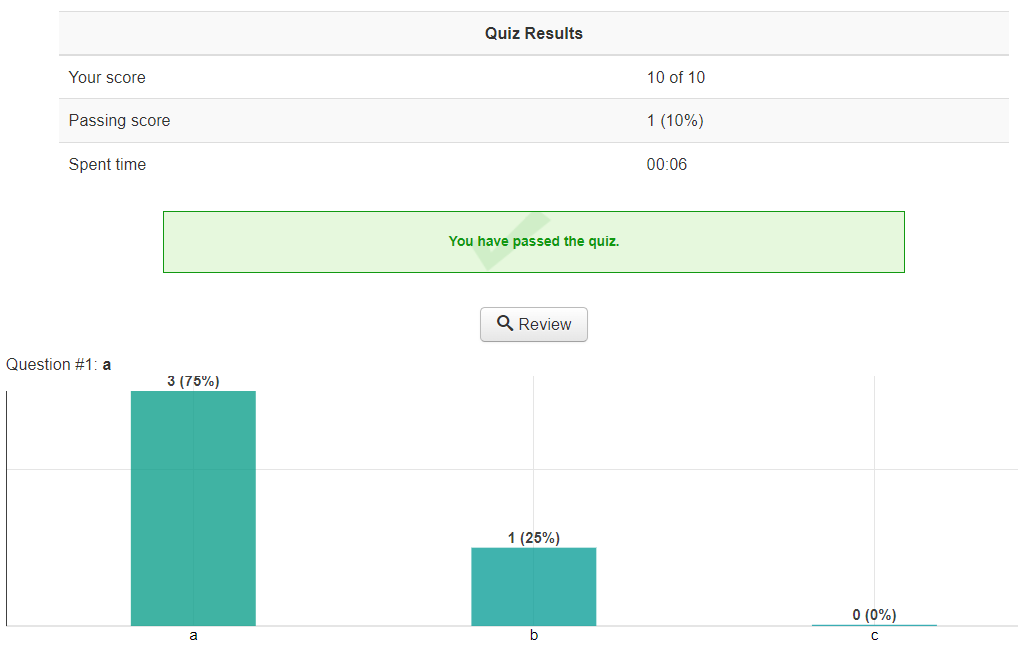
- Display this message if the user passes: enter your own custom feedback in this field, if you want to replace the default feedback displayed at the quiz results page when a Student passes the quiz. By default, the feedback to the quiz passed is You have passed the quiz.
- Display this message if the user fails: enter your own custom feedback in this field, if you want to replace the default feedback displayed at the quiz results page when a Student fails the quiz. By default, the feedback to the quiz failed is You have failed the quiz.
Review
The Review tab allows you to configure the review mode settings of the quiz. In JoomLMS, the Review mode allows the Students to go through all the questions of the quiz after they complete a quiz attempt, in order to review the questions and their own/correct answers to the questions in this particular quiz attempt.
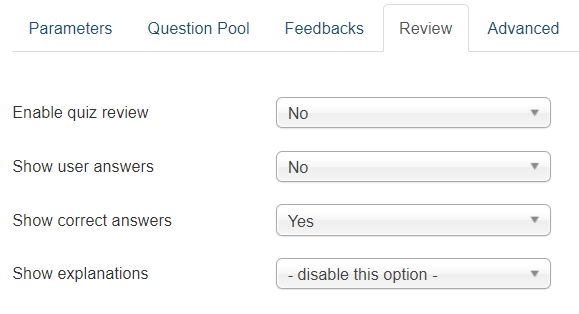
The following settings can be configured in the Review tab:
- Enable quiz review: select Yes from the drop-down menu, if you want to enable the Review mode for this quiz. When the Review mode is enabled, your Students will see the Review button at the quiz results page. Select No from the drop-down menu, if you don't want to enable the Review mode. When the Review mode is disabled, all the other settings at the Review tab are disregarded by the system.
- Show user answers: select Yes from the drop-down menu, if you want the Students to see their own answers to the questions, submitted during a quiz attempt, when they go through the quiz review. Select No, if you don't want the Students' answers to be displayed in the quiz review.
- Show correct answers: select Yes from the drop-down menu, if you want the Students to see the correct answers to the questions, as configured in the questions settings, when they go through the quiz review. Select No, if you don't want the correct answers to be displayed in the quiz review.
- Show explanations: select disable this option from the drop-down menu, if you don't want the Students to see the explanations for the correct answers to the questions, as configured in the questions settings, when they go through the quiz review. Select for all users, if you want all of the Students to see the explanations for the correct answers, regardless of their results for the quiz attempt. Select who have passed, if you want only the Students who passed the quiz attempt to see the explanations for the correct answers. Select who have not passed, if you want only the Students who failed the quiz attempt to see the explanations for the correct answers.
Advanced
The Advanced tab allows you to configure several advanced settings of the quiz.
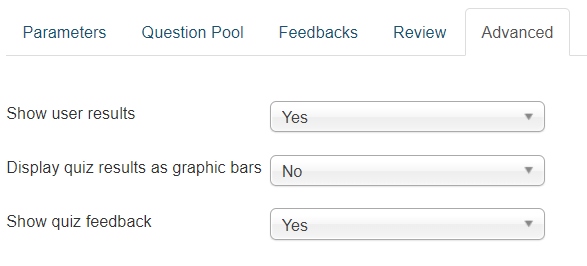
The following settings can be configured in the Advanced tab:
- Show user results: select Yes from the drop-down menu, if you wish the Students to see the number of points they have received for the correct answers and the total number of points available in this quiz at the quiz results page. Select No, if you don't want the Students to see any information about points when they complete a quiz attempt.
- Display quiz results as graphic bars: select Yes from the drop-down menu, if you wish the Students to see the results of the quiz presented in graphic form with the statistics on answers from all the attempts for this quiz taken by this particular Student. Select No, if you don't want the graphic statistics to be displayed.
- Show quiz feedback: select Yes from the drop-down menu, if you want the Students to see the confirmation that they passed/failed the quiz at the quiz results page. Select No from the drop-down menu, if you don't want the Students to see if they passed or failed after they complete the quiz attempt.